

Two tablespoons of yogurt can turn 8 cups of milk into a full batch.
That’s the ratio the Instant Pot Culinary Team uses, and the pot handles the boiling and the 10-hour warm hold for you.
Of all the Instant Pot recipes, yogurt asks the least of you: a thermometer check, a quick ice bath and a whisk.
Below are 9 yogurt recipes built on one base method, ranked by how much you need beyond milk and starter.
Each one comes with its time and the first thing to do today.
- First batch ever: make #1 and keep 2 tablespoons as your next starter.
- Thick, spoon-standing yogurt comes from #4, and #6 goes even thicker.
- If you’d rather skip the boil and the thermometer, #8 is your recipe.
- Dips and dinner sides live at #2 and #7.
How This List Is Ranked
These 9 recipes are ranked by what you need beyond milk, a starter and the pot itself. #1 and #2 need nothing extra, #3 through #7 add an ingredient or a strainer, and #8 and #9 need special milk or heatproof jars.
Every recipe except #8 also needs an instant-read thermometer, because the base method checks the milk twice.
The Yogurt button is what separates a multi-cooker from the other cooking appliances on your counter: it holds milk warm for hours without you watching. So if you’re still choosing a pressure cooker with that button, check for it before anything else.
The 9 Best Instant Pot Yogurt Recipes
The 9 best Instant Pot yogurt recipes are classic yogurt, Indian dahi, vanilla bean yogurt, Greek yogurt, yogurt parfaits, labneh, tzatziki, cold start yogurt and yogurt in jars. All 9 start from the same Yogurt program, so once #1 works, the rest are small changes.
That makes yogurt one of the easiest Instant Pot recipes to build a habit around.
1. Classic Boil-Method Yogurt
Classic Instant Pot yogurt takes 8 cups of whole milk, 2 tablespoons of plain yogurt and the Yogurt button: boil the milk to 180°F, cool it to 110°F, then incubate it for 10 hours.
Every other recipe on this list builds on it with one change, so nail this one first.
Best for: first-timers and anyone with a regular jug of milk. Skip it if you already buy ultra-filtered milk and hate thermometers (go to #8).
Cost: Nothing beyond 2 ingredients: milk and plain yogurt with live cultures.
Time: Same day (about 15 hours, almost all of it waiting).
First step: Buy a small container of plain yogurt that lists live and active cultures on the label.
Here’s the method from the Yogurt Parfaits recipe by Instant Pot, which uses 8 cups of whole milk and 2 tablespoons of plain yogurt:
- Pour the milk into the pot, lock the lid and turn the valve to Sealing. Press Yogurt until the screen says “Boil,” and the milk reaches 180°F (82°C) in about 25 minutes.
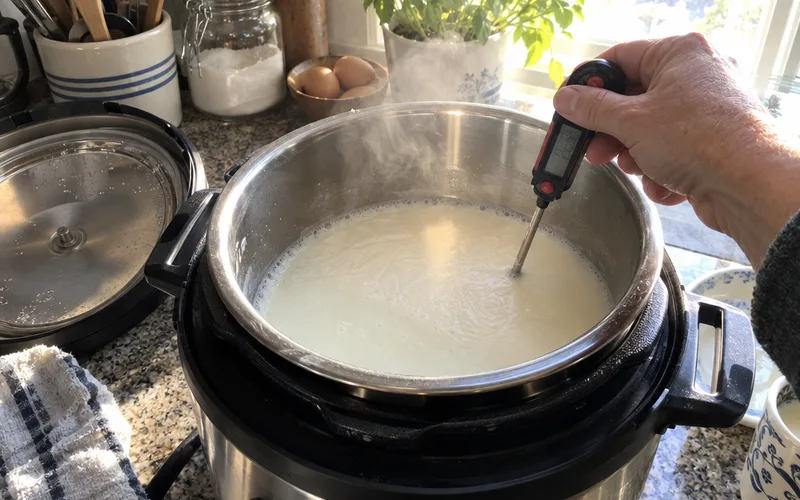
- Check the temperature with an instant-read thermometer. If it’s short of 180°F, press Cancel and finish heating on Sauté.
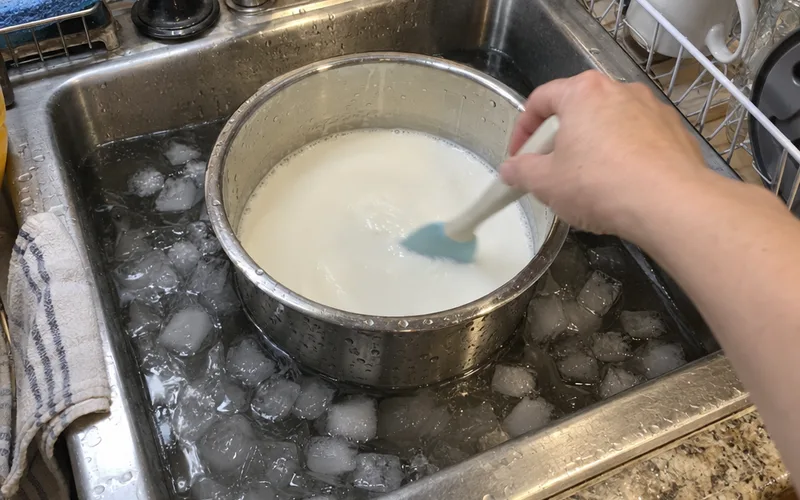
- Set the inner pot in an ice-water bath in the sink and stir until the milk cools to 110°F (43°C), about 10 minutes.
- Whisk the yogurt into 1 cup of the warm milk until smooth, pour it back into the pot and whisk again.
- Return the pot to the base and lock the lid with the valve on Sealing or Venting. Press Cancel, press Yogurt and set the time to 10 hours.
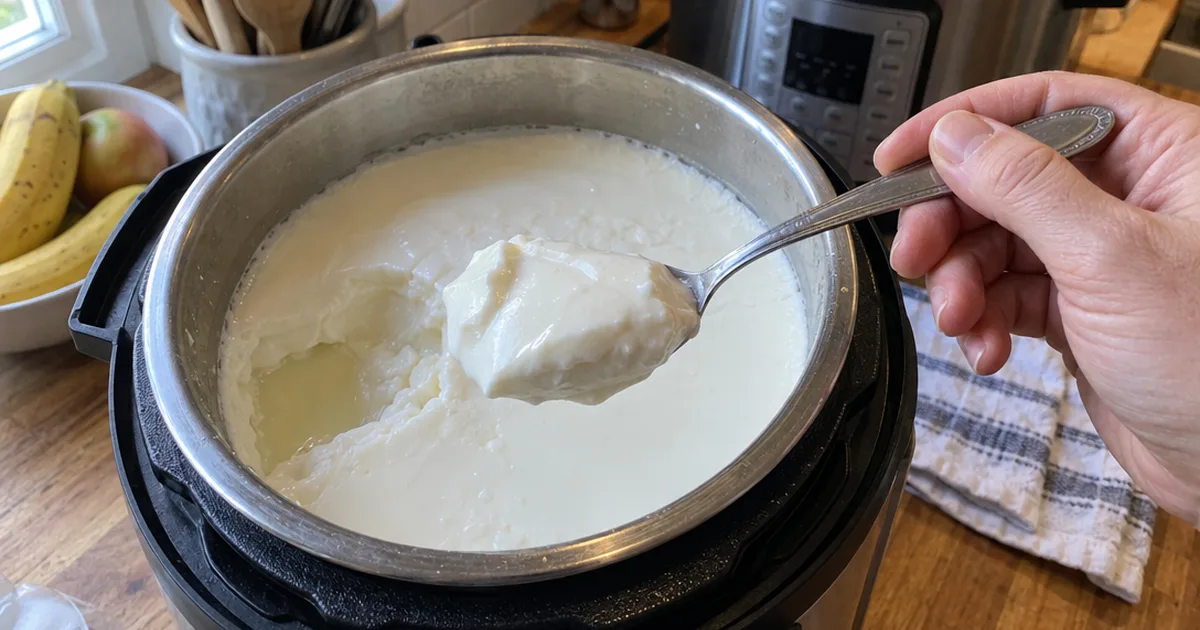
- When the screen reads “Yogt,” lift out the pot, cover it and refrigerate it for about 4 hours without stirring.
The most common way this recipe fails is adding the starter while the milk is still too hot.
So trust the thermometer, not your finger.
Get this one right once, and the other 8 recipes are just tweaks.
2. Indian Dahi (Curd)
Indian dahi, or curd, uses the same pot and Yogurt program as #1, with a smaller spoonful of starter and a shorter, milder set.
It’s the everyday yogurt of Indian kitchens, eaten with rice, dal and spicy meals.
Best for: anyone who wants a mild, softly set yogurt for lunch and dinner. Skip it if you want thick breakfast yogurt (see #4).
Cost: Nothing extra.
Time: Same day.
First step: Save a spoonful from your last batch of #1, or buy plain whole milk yogurt.
Dahi changes 3 things about the base recipe:
- Heat and cool the milk exactly as in #1, then stir in a smaller spoonful of starter.
- Start checking well before the 10-hour mark, and stop when the curd holds together but still tastes mild.
- Chill it in the bowl you’ll serve from, so the set stays unbroken.
For example, a bowl of dahi with a pinch of salt is a cooling side for a spicy curry.
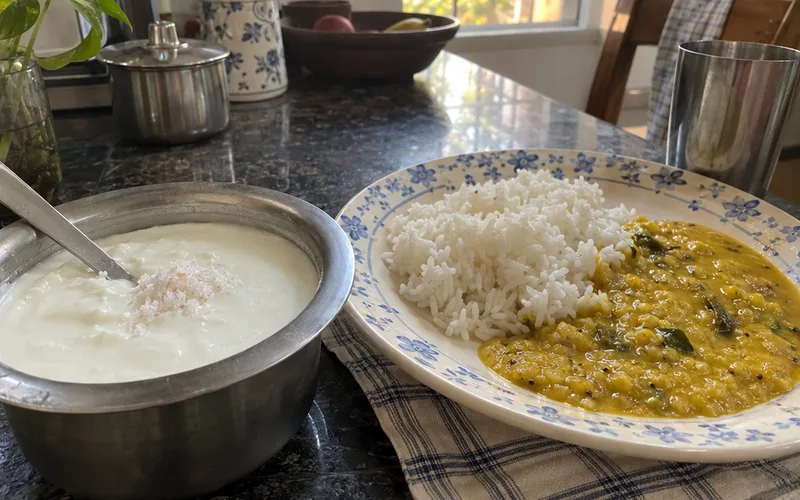
Leftovers blend with mango and a splash of milk into lassi, and any of the blenders under $200 can handle that job.
3. Vanilla Bean Yogurt
One vanilla bean turns plain yogurt into something closer to dessert.
The trick is adding it after the yogurt sets, never before.
Best for: kids and anyone who finds plain yogurt too sour. Skip it if this batch has to supply your next starter, unless you set a plain spoonful aside first.
Cost: 1 vanilla bean, or 1 tablespoon of vanilla extract.
Time: Same day.
First step: Split 1 vanilla bean lengthwise and scrape out the seeds with the back of a knife.
Say you’ve just pulled a chilled batch of #1 from the fridge. Stir in the vanilla seeds and a drizzle of honey, then chill it for another hour so the flavor spreads through the whole pot.
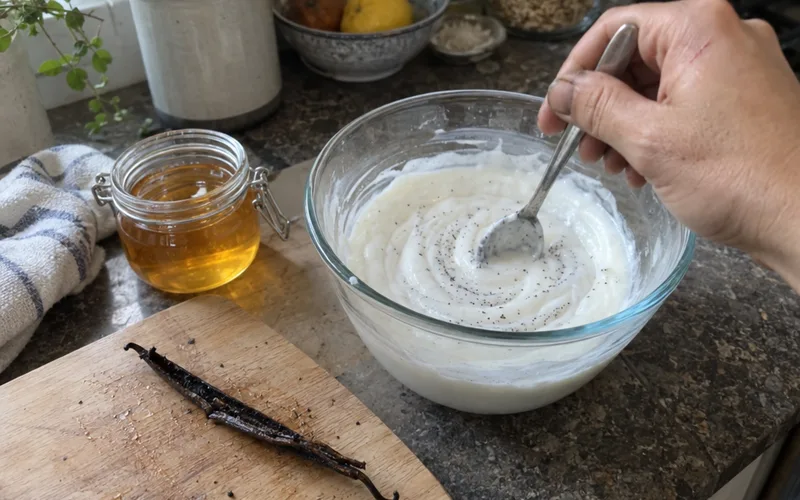
Stirring will loosen the set a little, and that’s normal.
But whisk once, gently, and stop, because every extra stir thins it more.
4. Thick Greek Yogurt
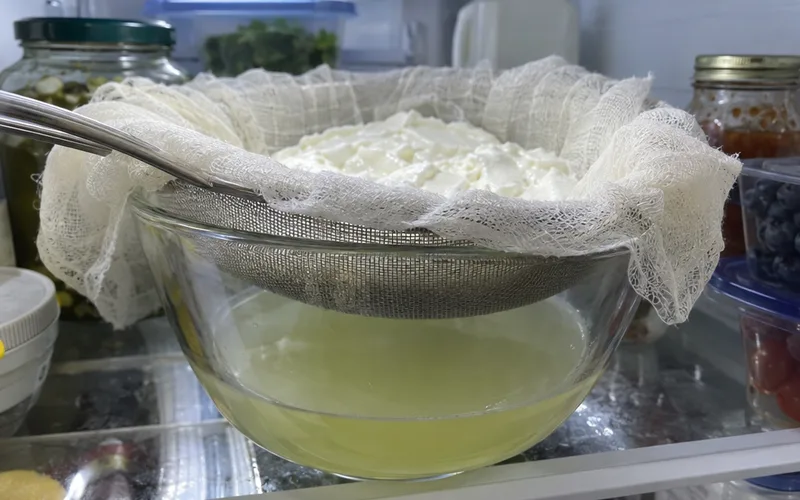
Instant Pot Greek yogurt is the yogurt from #1 strained through cheesecloth for about 2 hours, until the watery whey drains out.
You make #1, then let gravity do the rest.
Best for: anyone who likes yogurt thick enough to hold a spoon upright. Skip it if you need the full batch volume, because straining shrinks it.
Cost: Cheesecloth and a fine-mesh sieve, or a dedicated strainer.
Time: Same day (about 2 hours longer than #1).
First step: Line a large fine-mesh sieve with 4 layers of cheesecloth and set it over a bowl.
The manufacturer’s recipe spoons the set yogurt into that lined sieve and lets it drain in the fridge for 2 hours. Longer straining makes it thicker, and it’s a staple of many high-protein vegetarian Instant Pot meal plans.
If you strain a batch every week, a dedicated strainer saves the cheesecloth fuss.
The Euro Cuisine GY50 on Amazon is listed as converting up to 2 quarts of regular yogurt into Greek yogurt. That covers the full 8-cup batch from #1.
Straining is also where most batches go right or wrong, which is why the Greek yogurt method has its own walkthrough.
Key Takeaway: A cheesecloth-lined sieve and a little patience turn #1 into thick, spoonable yogurt.
5. Yogurt Parfaits
This is the recipe the Instant Pot Culinary Team built around the Yogurt button itself.
It layers strained yogurt with seeds, nuts and fruit in 4 glasses.
Best for: make-ahead breakfasts and brunch. Skip it if you’re out of fruit and nuts, since plain #4 with honey is just as good.
Cost: Toppings: seeds, nuts, granola and fresh or dried fruit.
Time: Same day (#4 plus a few minutes of layering).
First step: Pick 1 crunchy topping and 1 fruit from the lists below.
Its topping list includes these crunchy options:
- Sunflower seeds or pepitas
- Toasted sliced almonds or chopped pecans
- Granola or puffed quinoa
For the fruit layer, it uses fresh or dried stone fruit and fresh or dried berries.
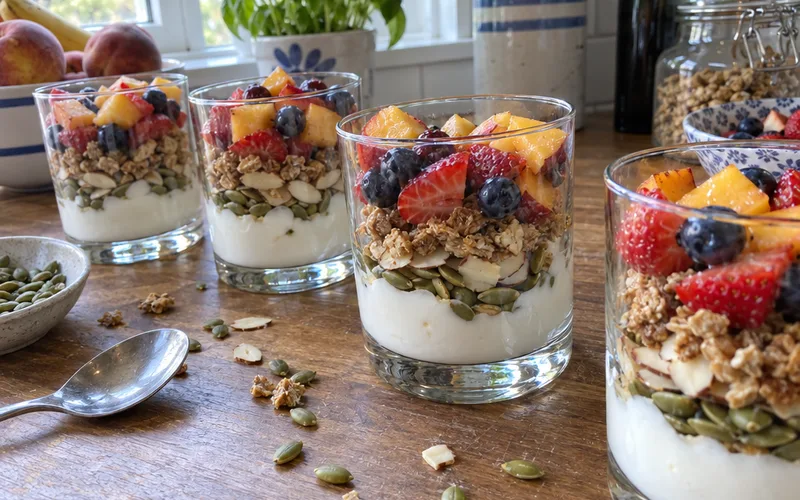
Spoon yogurt into each glass, add a layer of seeds or nuts, then a layer of fruit, and repeat until the glasses are full.
In other words, one 8-cup batch of yogurt is 4 parfaits away from breakfast.
6. Labneh
Labneh is the yogurt from #4 drained so long it turns into a soft, spreadable cheese.
It’s a strained yogurt cheese, and the easiest cheese you’ll ever make.
Best for: snack boards, toast and dips. Skip it if you need yogurt for eating with a spoon this week.
Cost: Cheesecloth and a pinch of salt.
Time: This week (it strains overnight).
First step: Stir a pinch of salt into a batch of yogurt before it goes into the sieve.
Here’s how it works:
Start the same way as #4, but leave the sieve in the fridge overnight instead of pulling it after 2 hours. By morning, the yogurt holds its shape like soft cheese, ready to spread on toast or swirl onto a plate with olive oil.
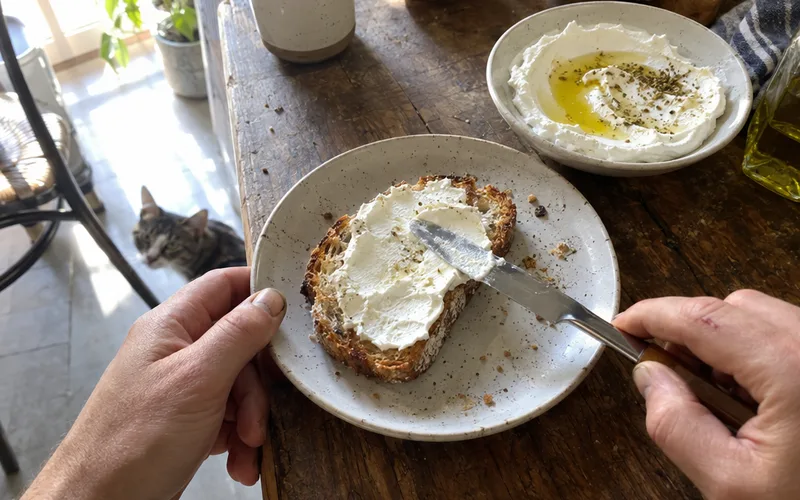
Squeezing the cloth seems like a shortcut, but it pushes the curd through the weave along with the whey.
So let it drip on its own.
7. Tzatziki
Tzatziki is a Greek dip of thick yogurt, grated cucumber, garlic, lemon and dill.
The strained batch from #4 makes it thick enough to scoop.
Best for: grilled chicken, gyros and raw vegetables. Skip it if garlic isn’t welcome in your house.
Cost: 1 cucumber, 1 garlic clove, a lemon and fresh dill.
Time: Same day.
First step: Grate 1 cucumber and squeeze it dry in a clean kitchen towel.
- Grate the cucumber and squeeze out as much water as you can.
- Stir it into 2 cups of the yogurt from #4 with 1 grated garlic clove, the juice of half a lemon, chopped dill and a pinch of salt.
- Chill it for an hour so the garlic mellows.
It’s a natural side for healthy Instant Pot chicken dinners, since both can come out of the same pot on different days.
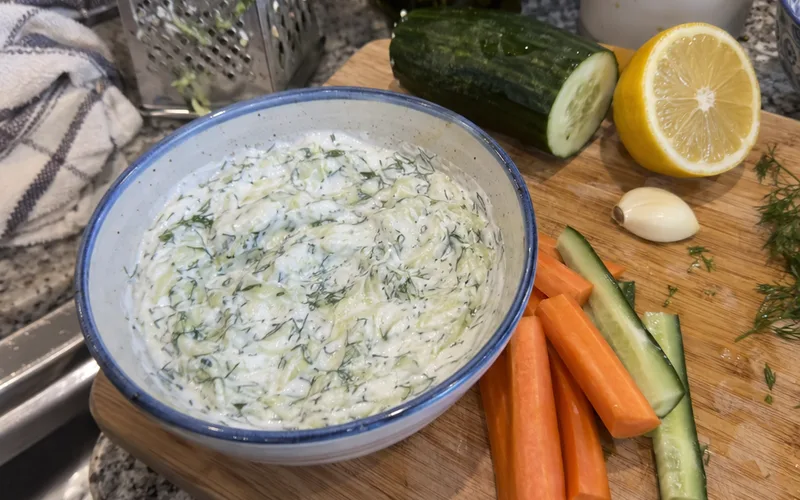
Squeezing the cucumber is the step that keeps it thick, so don’t skip it.
8. Cold Start Yogurt
Cold start yogurt skips the boil and the ice bath: you whisk cold ultra-filtered milk with your starter and press Yogurt.
That’s the whole hands-on part.
Best for: busy weeks and anyone who hates babysitting a thermometer. Skip it if you only buy regular pasteurized milk, since that’s what #1 is for.
Cost: A carton of ultra-filtered milk, such as Fairlife.
Time: Same day (about 35 minutes less heating and cooling than #1).
First step: Check your milk carton for the words “ultra-filtered” or “ultra-pasteurized.”
Here’s the math:
Per the manufacturer’s recipe, the boil in #1 takes about 25 minutes and the ice bath about 10. Cold start cuts both, so you skip about 35 minutes of heating and cooling per batch.
Not bad.
The catch?
This method only works with ultra-filtered or ultra-pasteurized milk, so a regular jug sends you back to #1.
9. Yogurt in Jars
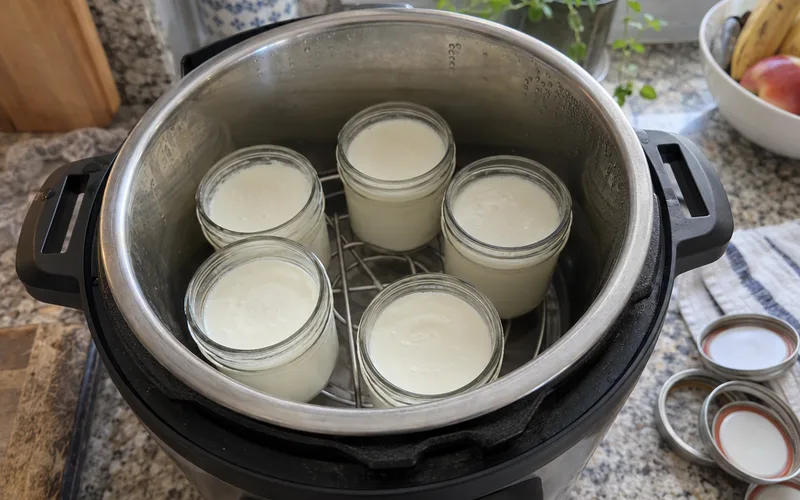
Setting the milk right in jars gives you grab-and-go portions with no ladling.
The jars sit in the inner pot while the Yogurt program keeps them warm.
Best for: lunchboxes and portion control. Skip it if you don’t own heatproof jars.
Cost: Heatproof glass jars, such as half-pint canning jars, and the trivet that came with your pot.
Time: Same day.
First step: Check how many jars fit on the trivet with the lid closed.
- Heat and cool the milk as in #1, then whisk in the starter.
- Pour the milk into clean jars and set them on the trivet inside the inner pot.
- Lock the lid, press Yogurt and set the same time you’d use for #1.
- Cap the jars and move them straight to the fridge.
That way, every jar is a ready breakfast the moment it sets.
How Long to Incubate Instant Pot Yogurt
Instant Pot yogurt should incubate for 10 hours on the Yogurt program for a first batch, the time set in the Yogurt Parfaits recipe from Instant Pot. Shorter incubation gives a milder yogurt, and longer gives a tangier, firmer one.
Even at 10 hours, the manufacturer says its pot makes creamy, full-fat yogurt that is significantly less tangy than store-bought varieties.
So if store tubs taste sour to you, 10 hours is likely to suit you.
What about overcooking?
The Yogurt program holds the milk warm rather than pressure cooking it, so the yogurt won’t burn. Left far past its timer, though, it keeps fermenting and turns sourer and looser.
Pro Tip: Note the hours on each batch, then move the next one up or down by 1 hour until the tang is right.
Which Milk Makes the Best Instant Pot Yogurt
Whole milk makes the creamiest Instant Pot yogurt, and it’s the milk the manufacturer’s own recipe uses, 8 cups per batch. Lower-fat milk also sets, but it comes out thinner and benefits more from straining.
Your milk choice also decides your method:
- Regular pasteurized milk needs the boil and cool steps of #1.
- Ultra-filtered or ultra-pasteurized milk can go straight into the pot for #8.
- Plant-based milks follow their own recipes, which is why this list sticks to dairy milk.
The cream in whole milk gives the finished batch its rich texture. So start with whole milk, and switch only after your first batch works.
Instant Pot Yogurt Mistakes to Avoid
Three easy-to-miss mistakes spoil Instant Pot yogurt: a flavored starter, a skipped chill and a sealing ring that smells of last night’s dinner.
The starter has to be plain. A sweetened or flavored cup adds sugar and other ingredients to a batch meant to ferment plain milk.
So buy plain, and add flavor after it sets, as in #3.
The chill is part of the recipe, too. The manufacturer’s recipe refrigerates the pot for about 4 hours and says not to stir it then.
So plan breakfast for the next morning, and use a fridge that’s truly cold (if yours has a dial, check the fridge temperature setting first).
The silicone sealing ring can carry the smell of last night’s chili into your next batch.
The same recipe lets the valve sit on Sealing or Venting during incubation, since no pressure builds. So keep a second ring just for yogurt, or wash the one you have before every batch.
Frequently Asked Questions
Can I use my Instant Pot to make yogurt?
Yes, any Instant Pot with a Yogurt button can make yogurt from start to finish: it boils the milk to 180°F (82°C) and then holds it warm while it ferments. The manufacturer publishes its own yogurt recipe that incubates 8 cups of whole milk for 10 hours.
Start with plain yogurt that lists live and active cultures as your starter.
What is the best temperature for making yogurt?
The best temperature for adding yogurt starter is 110°F (43°C), after the milk has first been heated to 180°F (82°C), according to the yogurt recipe from Instant Pot. An ice-water bath brings the milk down to 110°F in about 10 minutes.
Use an instant-read thermometer for both checks.
How many hours to strain yogurt?
Strain Instant Pot yogurt for 2 hours in the fridge to turn it into Greek yogurt, which is the time Instant Pot gives for a sieve lined with 4 layers of cheesecloth. Leave it overnight if you want labneh, the spreadable version.
Is it worth it to make yogurt in an Instant Pot?
Yes, making yogurt in an Instant Pot is worth it if you eat plain yogurt often, because 8 cups of milk and 2 tablespoons of starter make a full batch while the pot does nearly all the work. Instant Pot also says its yogurt is significantly less tangy than store-bought, a plus if store tubs taste sour to you.
Can you overcook yogurt in an Instant Pot?
Yes, yogurt left in the Instant Pot past its timer keeps fermenting and turns sourer and looser, though it won’t burn on the Yogurt program. Move the pot to the fridge as soon as the screen reads “Yogt” and the incubation stops.
Which is better for making yogurt, a yogurt maker or an Instant Pot?
An Instant Pot is the better yogurt maker if you already own one, because its Yogurt program handles both the boil and the warm incubation in one pot. Many products sold as Greek yogurt makers, such as the Euro Cuisine GY50, are strainers that thicken yogurt you’ve already made, up to 2 quarts at a time.
Can you make yogurt in an Instant Pot without the yogurt button?
You can heat the milk in an Instant Pot without the Yogurt button, since Sauté is the setting the manufacturer itself uses to finish heating milk to 180°F. The incubation is the hard part, because you’d need another way to hold the milk warm for hours, so a model with the button is the reliable route.
Final Thoughts
The Yogurt button turns 2 tablespoons of starter and a jug of milk into a full batch, and every recipe on this list grows from that one base.
Make #1 this week, and save 2 tablespoons of it in a small jar before you eat the rest. That spoonful is the starter for #2 through #9.